{{item.name}}
Price: {{currency}}{{item.price| numberThousandsCommas | numberDecimalPoint}}
Qty: {{item.amount}}
Remote Work & Learning
Projector
Monitor
Lighting
Interactive Display | Signage
Remote Work & Learning
Store

Figure 01: A rare selfie of me. This is my where I process my images.
Many photographers dislike Colour Management, either because it sounds complicated, or that it appears timeconsuming. Colour Management can be both, but it need not be. This short article provides the theory underpinning Colour Management. It illustrates the pipeline through which digital colour passes from camera through to output as print or on-screen display. It also does some bit of jargon busting. As an educator I like to see the reaction of learners in class, to better understand their comprehension of my teaching. In this article I stick to the essentials, and I hope I have been clear and concise enough for a broad range of learners.
I have been teaching since the early 1990’s to college and university students, as well as countless professionals and photography enthusiasts. This tutorial pulls together my research and experience of managing colour both as a graphic designer, and professional photographer.
The following topics will be covered, Why Colours Do Not Match, The Path To Reliable Colour, Colour Models, Translating Colour Between Devices, Benchmarking Colour Management. Though we will begin with a definition of Colour Management.
The art and science of predictably translating environmental colours through digital input devices into reliable,high-fidelity, output
Colour Management is an Art, because what looks good, is to some extent, subjective. Being technically accurateis only a first step, which may then require some tweaks to make colours feel right. In a later tutorial I will outlinehow to make fine-art prints where this assertion will be explored further.
Colour Management is also a Science. The devices we use such as cameras, monitors, and printers can be calibrated and profiled to give predicable results. Using scientific methodology also helps us adhere to international standards, because cobbling together a workflow that only works with your equipment can not be trusted when sending work to others. My next two posts will look at Colour Preferences in Adobe Photoshop, Lightroom, and more…, plus Calibrating Colour Critical Displays.
Here is a little jargon busting. Calibration is setting devices to an appropriate set of values, much like a group of musicians tuning their instruments to concert pitch. Each instrument might have a different range of notes, but any shared notes would be in tune. Profiling is related to calibration, it is a record of the colours available in a device. For example a low-end monitor will have a smaller set of values than a colour critical one. The profile aids the translation of colour from one device to another.
I do not want to fall into legalese, but it is important to say Colour Management helps make colours predictable, because there is really no such thing as totally accurate colour matching system. We should can look to Colour Management to give us reliable colour, because a photographer's workflow should maximise creative potential, and minimise wasted time and resources.
I do not want to fall into legalese, but it is important to say Colour Management helps make colours predictable, because there is really no such thing as totally accurate colour matching system. We should can look to Colour Management to give us reliable colour, because a photographer's workflow should maximise creative potential, and minimise wasted time and resources.
When photographing outdoors the levels of ambient light vary, from a modest tonal range on a grey day, to a huge range on a bright sunny day. At night, street lights and dark shadows are similarly diverged. As photographers we need to recognise that there are many occasions when a camera can not capture all the tones and colours that we see. Cameras tend to have the widest tonal range of all the equipment photographers use. The tonal range of monitors vary depending on the type of monitor used, and the tones and colour of a print are dependent on the printer and paper used.
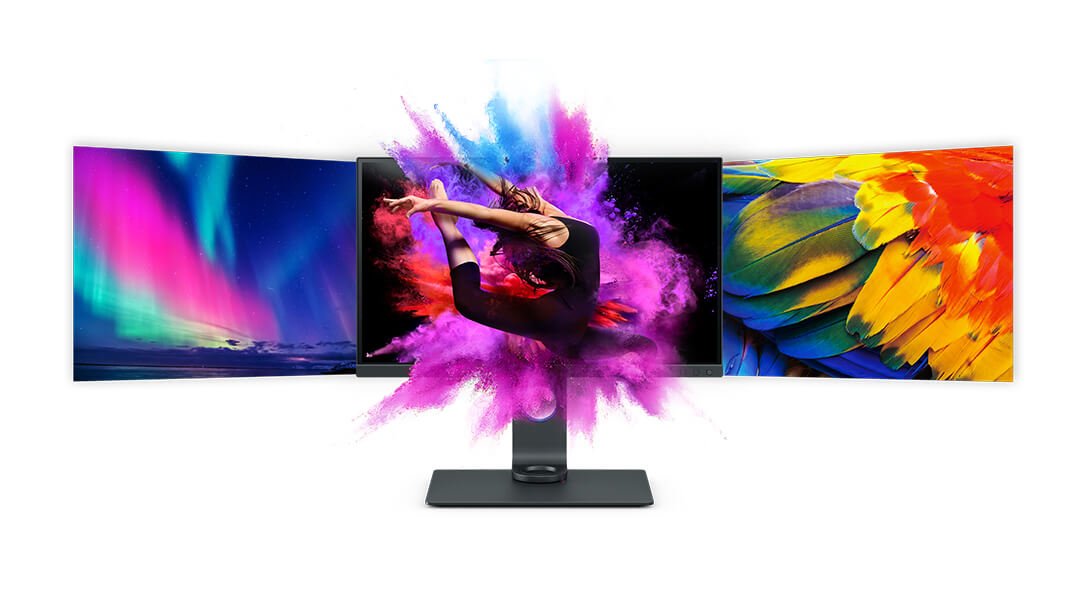
As such it is vital that it can be set to display the colours and tones of your photographs properly. A cheap monitor is not going to match the colour range and fidelity of a high quality colour critical BenQ monitor.
Figure 02: A representation of the digital darkroom conditions I work in.
To underline the importance of output devices, which can be a monitor or printer, please imagine three different output devices. Each is instructed to produce the brightest reddest red they can; we shall call that red, THE BRIGHTEST RED. Because of variations in manufacturing of each device the THE BRIGHTEST RED produced by the three devices will be different. Device A produces the most vibrate red, Device C the least vibrate, Device B’s red is slightly more blue. In theory it is possible to weaken the THE BRIGHTEST RED of Device A to make the THE BRIGHTEST RED of Device C, but impossible for Device C to make the THE BRIGHTEST RED of Device A. It would be fair to say we would want Device A every time.
Figure 03: THE BRIGHTEST RED produced by the three devices will be different.
Some colours in photographs that are not reproducible in print. I will explain Colour Models shortly, but for now please note that digital cameras record colour in three channels. These colour channels are red, green, and blue (RGB); the same colour model as monitors, smart phones, and data projectors. Most printing devices use four colour channels, being cyan, magenta, yellow, and black (CMYK). CMYK devices have less colours than many RGB devices. Not knowing this will lead to hours of frustration trying to get a CMYK print to match an RGB display. Colour Management will help, but with some caveats.
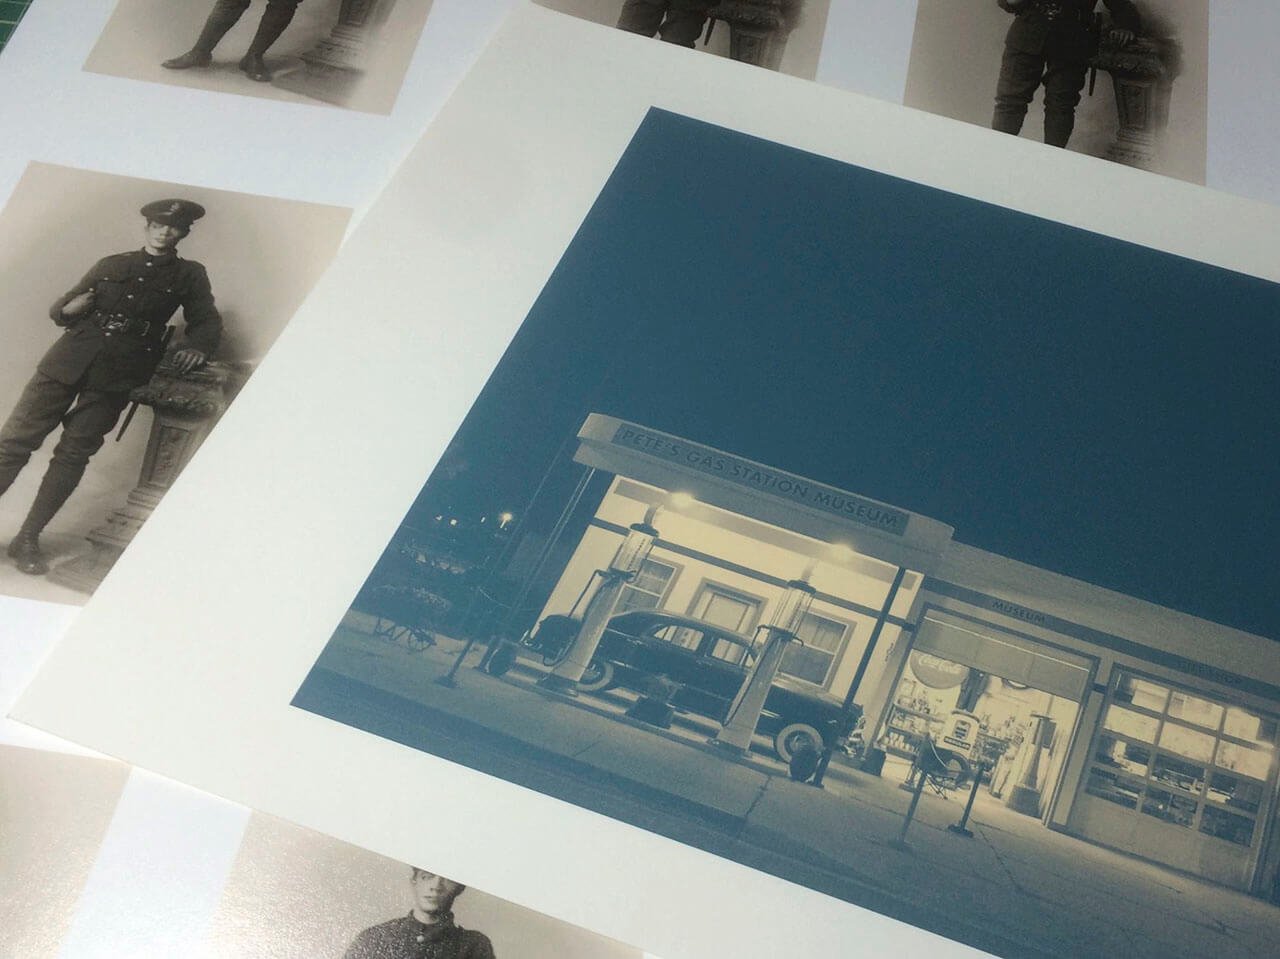
Figure 04: The photograph on the left is a RGB image. The photograph on the far right is a CMYK simulation of the same shot.
To further illustrate the RGB-CMYK issue, take a look at the guitar player photographs. The photograph on the left is a RGB image. The photograph on the far right is a CMYK simulation of the same shot; as you are likely to be reading this on a screen it would be wrong to call it CMYK because it is being rendered by a RGB device, conversely if you are reading this in print the photograph on the left would be a simulation of RGB. In class I give delegates a moment to digest that concept, and ask questions before moving on, as it is a very important point.
Let us move on. Note that the red in the CMYK simulation is more muted than in the RGB version. The changed colours can be shown in Photoshop by switching on the gamut warning, which is what is shown in the middle photograph. The range of colours available in a colour model is known as its gamut. In Photoshop gamut warnings can be switched on so that potential problems can be identified, but a better method of assessing changes in colours from source to output is to use soft proofing; a topic for another post.
Understanding colour models and colour spaces and the extent of their gamut is essential to Colour Management. THE BRIGHTEST RED in CMYK will be quite different from THE BRIGHTEST RED in RGB. Remember, THE BRIGHTEST RED refers to the brightest, strongest red producible on a given device.
As mentioned earlier, uncoated papers will always produce more muted colours than gloss paper. So if THE BRIGHTEST RED were to be printed on Device A on to both uncoated and then glossy paper, the THE BRIGHTEST RED on the uncoated paper would appear more dull than on the glossy stock.
To achieve a reliable colour workflow requires a logical and calm approach; random clicking through set-up options tainted with impatience are not the way to go. You will need a little peace the quiet to make sense of colour management. The set-up workflow is as follows:
Please note the use of the term ‘reliable’ colour. Science explains that it is impossible for an image on a monitor to match a print. Colour Management will help you achieve predictable and acceptable renditions of colour.
There are three colour models a photographer needs to understand, RGB, CMYK and Lab. Most of the devices used in digital photography use the RGB Colour Model, that is, using Red, Green and Blue channels to create colour. Channels is a term used in Photoshop; understanding Photoshop’s Channels is an important foundation skill.
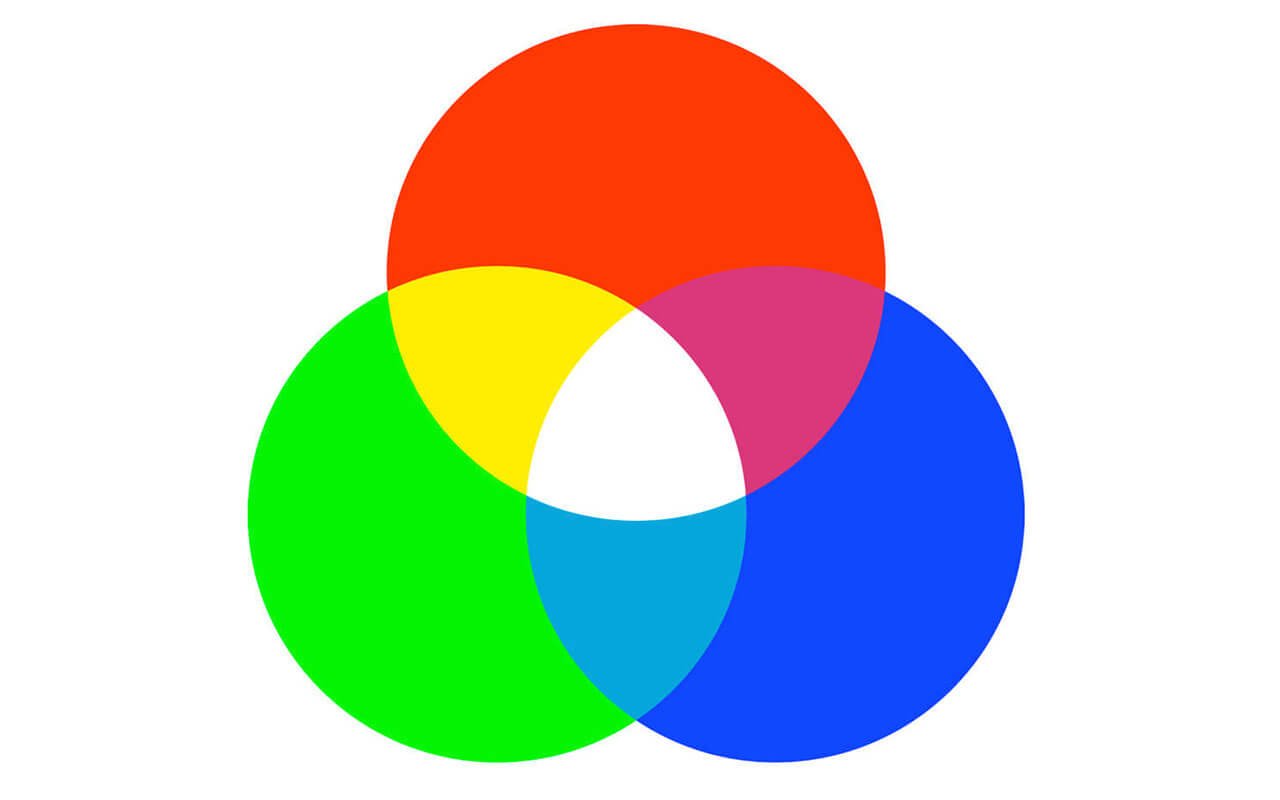
Figure 05: The Additive Colour Model. Red, Green, and Blue light combine to make white light.
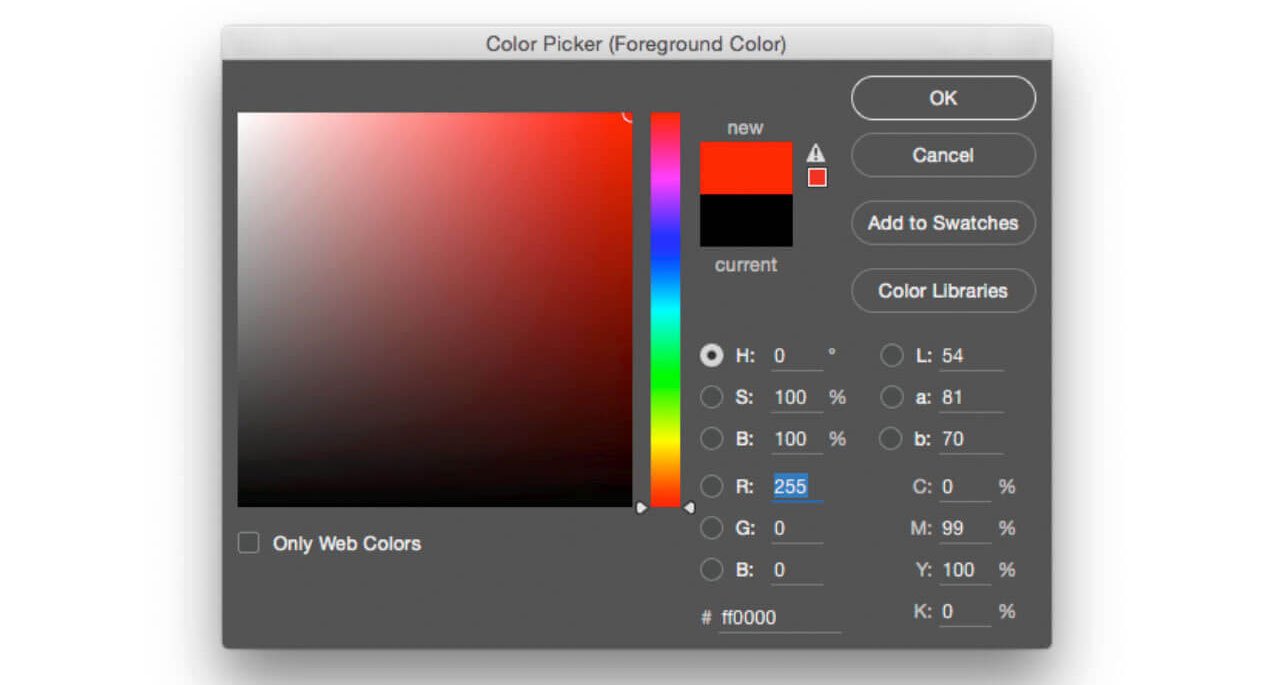
Digital colour is recorded as sets of numbers. Here is Photoshop’s Color Picker THE BRIGHTEST RED has been set. In RGB that red would be Red 255, Green 0, Blue 0. Historically the RGB model uses values between 0 and 255 to represent colour. If the values were changed to Red 0, Green 0, Blue 0 no colour value would be present, therefore Red 0, Green 0, Blue 0 creates black. White is Red 255, Green 255, Blue 255; the maximum value for each Channel. Imbalances of the RGB values create colour; that is if you do not consider white, black, and the neutral greys in between to be colours.
Figure 06: Here is Photoshop’s Color Picker THE BRIGHTEST RED has been set. In RGB that red would be Red 255, Green 0, Blue 0.
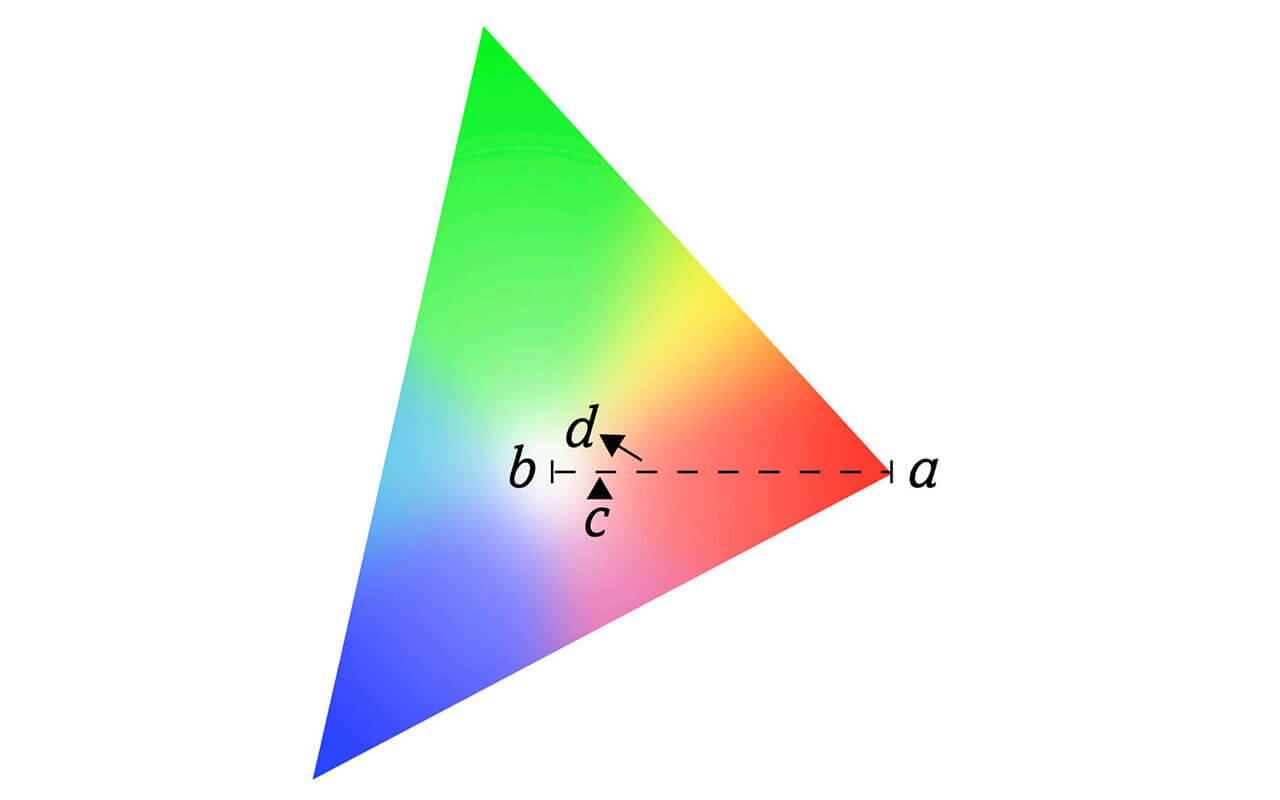
Figure 07: In digital imaging colours are defined in numbers. In RGB the colours a, b, c, and d in the diagram would be; a = Red 255, Green 0, Blue 0; b = Red 255, Green 255, Blue 255; c = Red 255, Green 200, Blue 200; d = Red 255, Green 255, Blue 200
If equal values of Green and Blue were added to THE BRIGHTEST RED changing Red 255, Green 0, Blue 0 to Red 255, Green 200, Blue 200 would change the THE BRIGHTEST RED to pink. Changing the values to Red 255, Green 255, Blue 200 creates a soft lemon yellow colour. To evaluate this try typing these values into Photoshop’s Color Picker.
Once applied to a camera, monitor, or scanner, the RGB colour model becomes Device Dependent, meaning that the perception of THE BRIGHTEST RED depends on the device used.
In application the CMYK colour model is also Device Dependent. CMYK is the colour model used to print magazines, newspapers, posters and books. Using combinations of Cyan, Magenta, Yellow and Black (CMYK) a variety of colours can be reproduced. When set to Cyan 0%, Magenta 0%, Yellow 0% and Black 0% the print would contain no ink and therefore no colour, other than that of the paper or substrate. When all the values are set to 100% a solid black is achieved. In reality printers do not lay down 100% of all the different inks, to do so would create messy pools of ink in the black areas of a print, that can look like an oil slick; the correct term for which is bronzing. Significantly the CMYK model has a greatly reduced range of colours compared to RGB. So there are colours that can be recorded in RGB that cannot be reproduced in CMYK.
Inkjet printers designed for photographers have additional inks other than standard CMYK. These extra inks help extend the colour gamut of a printer to match the colours of RGB. This means photographers can send RGB images to their inkjet printers without needing to convert them to CMYK.
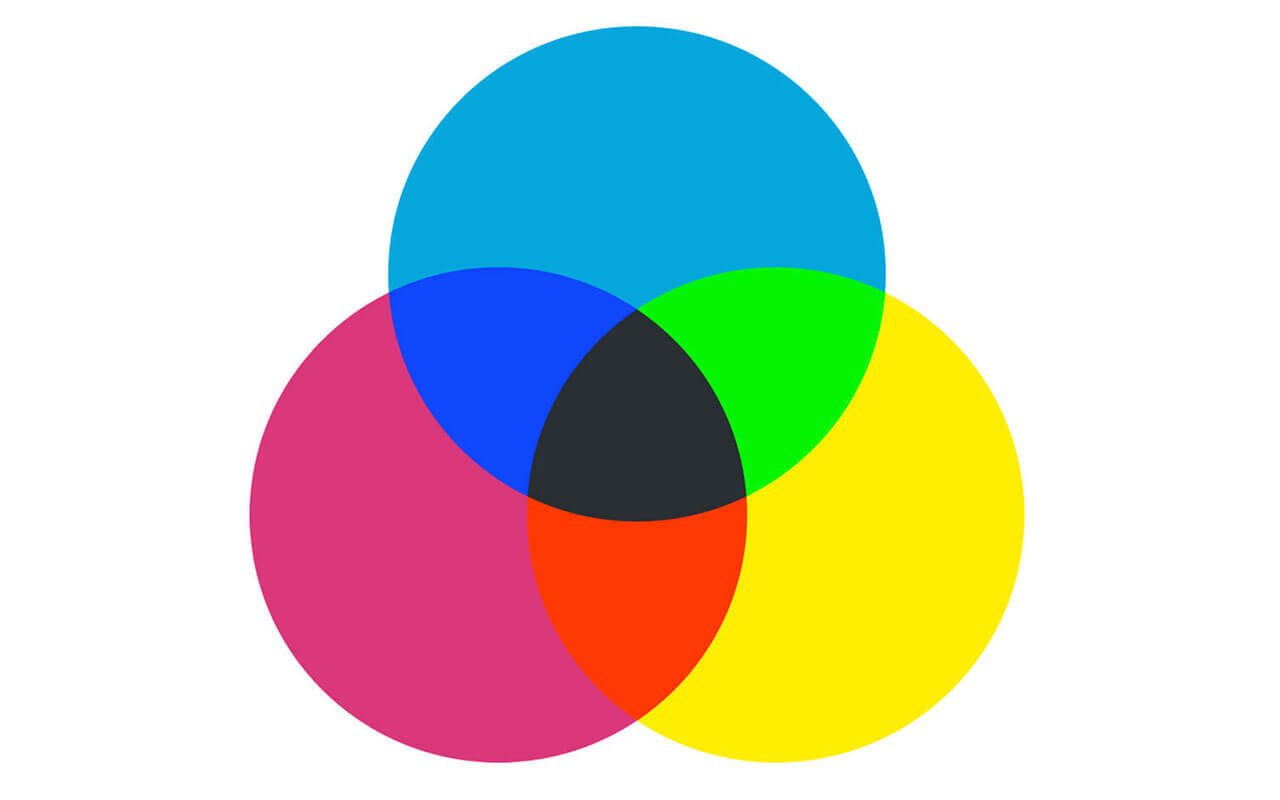
Figure 08: The Subtractive Colour Model: Cyan, Magenta and Yellow combine to make black. Note that the secondary colours here are red, green and blue.
Figure 09: The top row shows individual Cyan, Magenta, Yellow and Black plates. The bottom row shows the build up of plates; Cyan, Cyan & Magenta, Cyan, Magenta & Yellow and finally Cyan, Magenta, Yellow & Black.
If monochrome photographs are your thing, be aware that basic inkjet printers struggle to print neutral greys; in particular, older and cheaper models suffer from persistent colour casts, and even with lots of tweaking fail to print neutral greys. Unfortunately, forcing a file to print using only the printer’s black ink to create black and white prints is not a solution. The resulting print would lack the required tonal depth one would expect from monochrome. To address this monochrome issue some inkjet printers have more than one black ink cartridge. For example Epson’s K3 ink sets which have Black, Light Black, and Light Light Black to aid the production of stunning monochrome prints.
Colour values have to be pass from device to device as reliably as possible. THE BRIGHTEST RED of a camera will have different RGB values to that of a monitor. Colour needs to be mapped from RGB to RGB, or from RGB to CMYK. To do that a colour space larger than any device space is needed, a colour space that is independent of device colour. Lab Colour is a Device Independent Colour Model. It is a theoretical colour space based on the full range of colours of human perception.
The Lab colour space is bigger than device dependant RGB. Therefore devices using the RGB colour model cannot display all the colours we can perceive, and as described earlier the RGB colour spaces tend to be bigger than CMYK spaces.
Lab colour is important because the colours of any device whether RGB or CMYK can be accurately plotted within it. Lab colour forms the basis for translation of colour values from one device to another. As the brightest, strongest colour reproducible in a series of devices is different, the THE BRIGHTEST RED of each device will be different, but every single THE BRIGHTEST RED can be accurately plotted in the lab colour space.
Returning to Photoshop’s Color Picker, Figure 06, a variety of colour values can be read, HSB, RGB, Lab, CMYK, and Hexadecimal. For a colour to be accurately represented by each model that colour needs to be within the range of the smallest colour space.
International Colour Consortium (ICC) Colour Management is based on colour tables that translate the colours of a device, the input, into a Lab value, then in to the colour space of the next device in the colour workflow, the output. For example, THE BRIGHTEST RED in a digital camera becomes the Lab value for THE BRIGHTEST RED, which can then be translated into the equivalent of THE BRIGHTEST RED on a CMYK printer.
International Colour Consortium web site www.color.org
As described previously, colour reproduction is dependent on the capabilities, or gamut, of the device producing it. As an image is moved from one device to another its colour values must be translated, the accuracy of the translation is reliant on several factors, a major one being the quality of the equipment used. If a photograph is recorded on a device with a larger colour space than the device used for printing it is likely that any bright-vibrant colours will be lost, becoming duller and more muted than expected.
The first step in Colour Management is to ensure than each device in your workflow has been assigned its correct ICC profile. To do this reference has to be made to the user manuals and online help for, operating systems and application software, as well as for peripherals such as cameras, scanners and printers. Yes, reading manuals is necessary.
Monitors require particular attention as they are the window on your work; imagine a monitor that is set with a cold white, rather than neutral white. Any photographs that require a warm tone would normally be enhanced to have more vibrant red and orange hues, but the cold white bias would result in too much warmth being added.Monitor calibration is an essential step in achieving colour reliability, and the better the monitor the more reliable your colour workflow becomes.
Whether you choose to calibrate your colour workflow using software only, or you invest in calibration hardware, you will need to prove to yourself and others than you are running a properly colour managed system. This is particularly important for professional photographers who rely on third parties to print their work. If things go wrong you need to demonstrate that the fault does not lie with you. Using a colour management check-up kit is ideal for this. Here is an example of why benchmarking matters.
The black shape in Figure 10 contains two circles, one is grey, but is the other circle white?
Figure 10: How white is white?
Using a monitor that can be hardware calibrated means that white and black can be set reliably, not only that but all the greys in-between can be mapped properly. Hardware calibration is where a measurement device, referred to as a calibrator, is used to tune-up monitor without the need for any guesswork by the user. To underline this, look at Figure 10, in the space provided, could a brighter circle be added, or is the whiter circle the whitest white? Only a measurement device reading can answer that.
A colour management check-up kit usually contains a series of digital images and copies of those images printed accurately onto photo paper. To benchmark your monitor open the digital files in your photo-editor, for example Photoshop. If you have done your colour management correctly what you see on your monitor should match the prints contained in the check-up kit. Furthermore, when you print the files via your printer the output should match both the images on the monitor and on the check-up kit’s printed samples. So, if the sample prints match what you see on–screen, and your printer output, you are performing colour management correctly. There is one final check. You can ask your photo–lab to print copies of the digital files. The prints they produce should match the print samples in the check-up kit. If they do not, then the photo-lab is not getting their colour management right.
Colour Management need not be complicated, but navigating through the myriad of software and hardware options can seem like a confusing maze; full of frustration and doubt. This article has outlined the basic principles, and although it is not the whole story it should provide a sound foundation to achieving reliable colour in print and on-screen.
Figure 11: Printing should be rewarding, even magical. Getting your colour management in order will lead to great results.
This has only been an introduction to the principles of Colour Management. It is the first of twelve articles,tutorials, and videos related to the art and science of managing colour in digital photography. Earlier I wrote, ‘as an educator I like to see the reaction of learners in class, to better understand their comprehension of my teaching.’ If you have read this far, and the topics covered seem clearer I have done my job. Please look out for future posts that will cover topics such as, Colour Preferences In Adobe Photoshop, Lightroom, and more…, Calibrating Colour Critical Displays, Making Fine-Art Prints, How To Use A Professional Photo Lab, and Managing Colour On a Shoot.
{{productsCount}}Result
{{item}}
{{item.productWordingTag}}
{{currency}}{{item.finalPrice| numberThousandsCommas | numberDecimalPoint}} Save {{currency}}{{item.saveAmount | numberThousandsCommas | numberDecimalPoint}} Save {{item.savePercent | numberThousandsCommas | numberDecimalPoint}}%
new device price {{currency}}{{item.regularPrice| numberThousandsCommas | numberDecimalPoint}}
{{item}}
{{itemTag.title}}
Max 4 products to compare reached.


![How to Choose the Best Monitor for Mac® Devices [2024]](https://image.benq.com/is/image/benqco/mac-monitor_thumb?$ResponsivePreset$)