{{item.name}}
Price: {{currency}}{{item.price| numberThousandsCommas | numberDecimalPoint}}
Qty: {{item.amount}}
Accessories
You might think ceiling mounting a gaming projector is extremely difficult, but it’s not. We’re here with detailed instructions that’ll help you get it done yourself, without having to call a professional for help. The projector we’ll be using is the BenQ X3000i, which is an advanced gaming projector that’s perfect for PS5 and Xbox Series X/S.
Of course, on the path to setting up your dream game room, there are a few things to take into consideration above all else. You need to figure out how big of a screen you can fit, and we suggest you go for as big as possible, because that’s the benefit of projectors – big screens. Then, based on the size and shape of your room, calculate the best position for the projector. Next is making sure that position is topped with a ceiling that can accept the BenQ universal ceiling mount. You can’t use false or dropped ceilings, as the surface needs to be solid and dense material to support the weight of the projector.
The next step is choosing your screen, unless you prefer to project onto a wall. We recommend a tab-tensioned light rejecting screen for serious gaming. Such a screen will ensure you get the best visuals in your big screen gaming.
OK, here’s everything you need to know, both for preparation and actual installation!
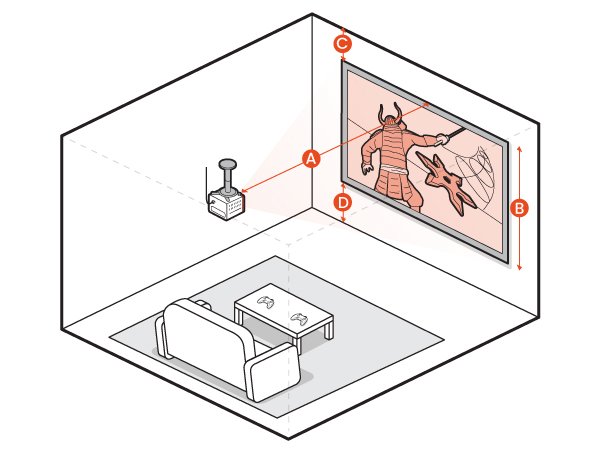
Key Measurements
It’s vital to take accurate measurements so that the projector and screen fit your room well. The most important measurements are:
Preparing the BenQ Universal Ceiling Mount
There are many types of projector mounts, some specific to certain models, and others claiming to be universal. However, you need to make sure the mount you’re using can support the weight of your intended projector. Also, there are ceiling mounts and wall mounts, and those are not interchangeable. In this article we’re discussing ceiling mounting the X3000i. A wall mount kit for a lighter projector will not work, so it’s important to get this right.
Without boasting too much, we’ve designed the BenQ universal ceiling mount kit to be really, well, universal. It’ll work with a wide range of models and save you the guesswork if you want ceiling mounting. We’ve put the kit through extensive testing, as we do with all our products, and it’s verified reliable and safe. It is not intended for wall mounting, however. You can purchase the BenQ universal ceiling mount right here.
The user manual for the kit is also available online if you want to have more info on it.
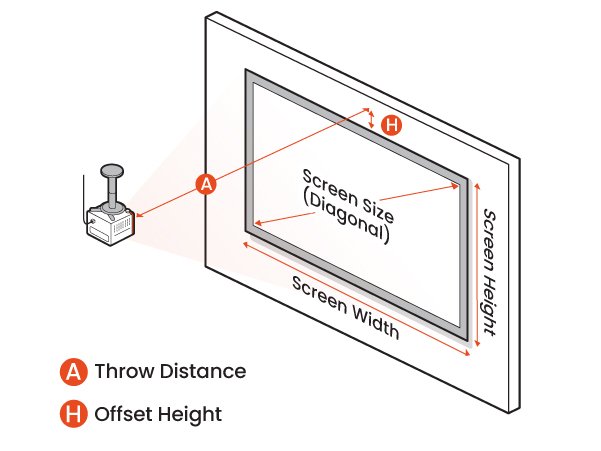
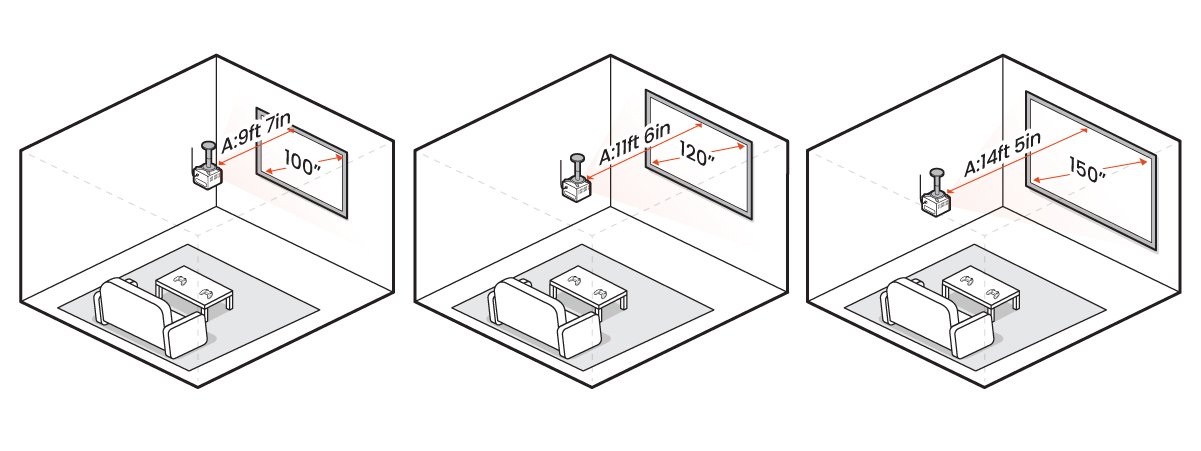
Preparing the X3000i Gaming Projector: Throw Distance and Offset
The design of a projector’s lens and overall optical capabilities determines the ideal throw distance, or projection distance. It also determines the offset height, or how much higher than the top of the screen the lens needs to be if at all.
Throw ratio: determines the distance (A) from the screen to the front edge of the projector. Note that this means the very front of the lens, not the ceiling mount axis.
Throw ratio = Projection distance (A) / Screen width
The X3000i has a typical throw ratio of 1.15-1.50.
Projector offset: indicates the distance (H) from the projector’s lens assuming a direct line to the top edge of the screen. In other words, the percentage of the screen height that will be projected above the projection lens optical axis.
Lens offset = (Screen height + Offset height ) / Screen height
The BenQ X3000i has an offset of 110%.
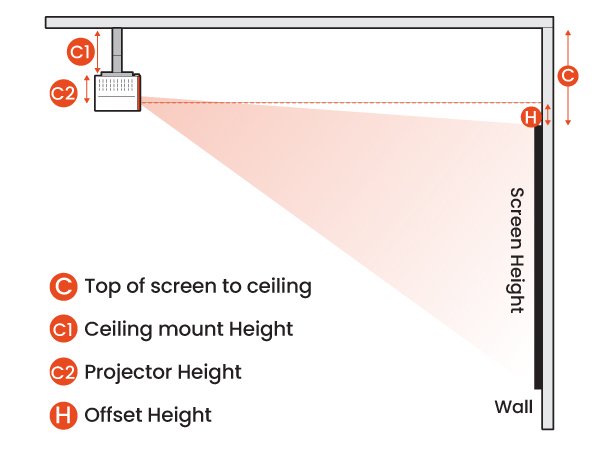
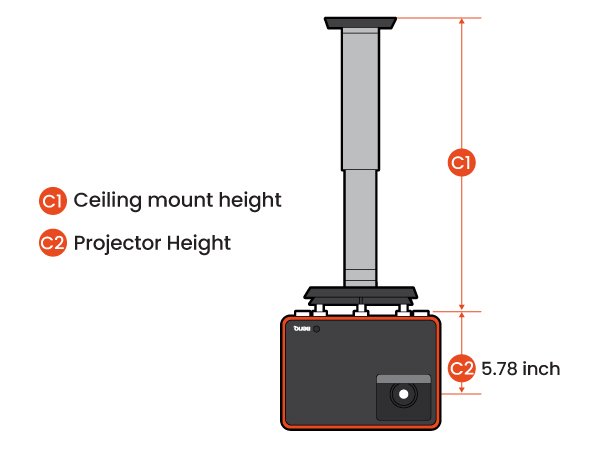
Note that ceiling mount height (C1) plus height from projector’s underside to center of lens (C2) plus distance from ceiling to center of the lens or offset height (H) may equal ceiling to top of screen clearance.
Prepare Your Room
Before installing the X3000i, take accurate measurements of your room. That includes height to ceiling, width, and length. Consider any object that may get in the way, like bookshelves, cabinets, AC units and so on. Be careful not to drill the ceiling mount into any existing utility cables or wires. Also consider whether the location of the screen has any constraints, and whether you should move any furniture to make room for the screen. Based on your intended room’s dimensions, you can proceed to choose the size of your screen.
Decide Screen Size
To decide on a screen size, accurately measure your room’s ceiling height. Then, consider the following factors, which may also be thought of as deductions from the total ceiling height in your room:
So, you get “B: Max screen height”, which translates into diagonal length, which is known also as max screen size (typically measured in inches)
Now you can choose the size of the screen proper, after learning the maximum size possible. Obviously, don’t buy a screen bigger than the maximum size possible in your intended room.
Decide Projector Placement
Let’s move on to projector placement. Start to calculate the projection distance and ceiling position using these:
As an example, let’s think of an X3000i installed in a room with a 9-foot-tall ceiling.
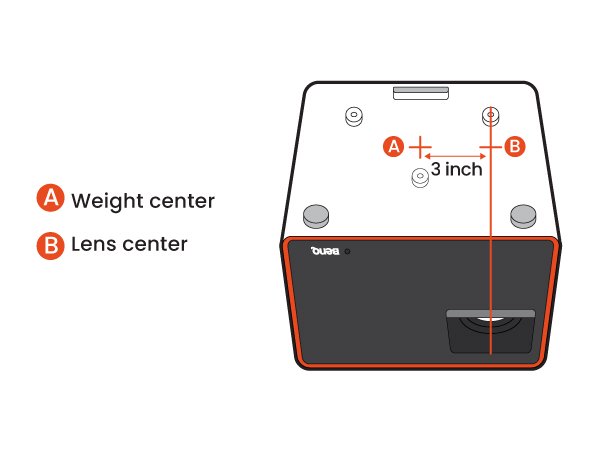
Upgrading to the X3000i with a Fixed Screen in Place
If you already have a screen in place and an existing projector setup but you want to upgrade to the X3000i, there are a few things to measure first. Of course, compare the throw ratio of your old projector (current setup) with that of the X3000i. Also, compare the distance between each projector’s lens center and center of weight, which is 3 inches for the X3000i. Based on these figures you can determine whether your current ceiling mount and screen need to be repositioned.
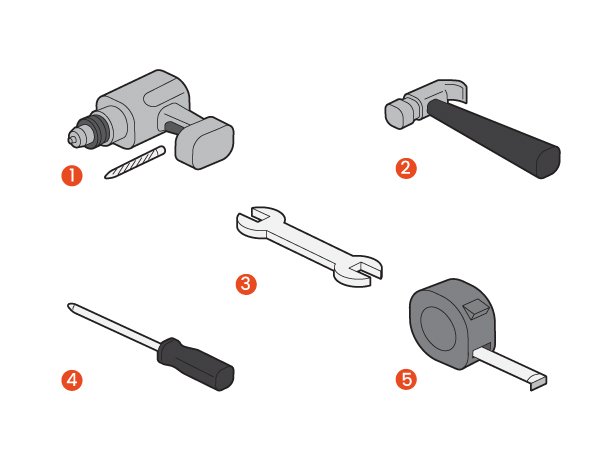
Before you get started, here are the tools you’ll need.
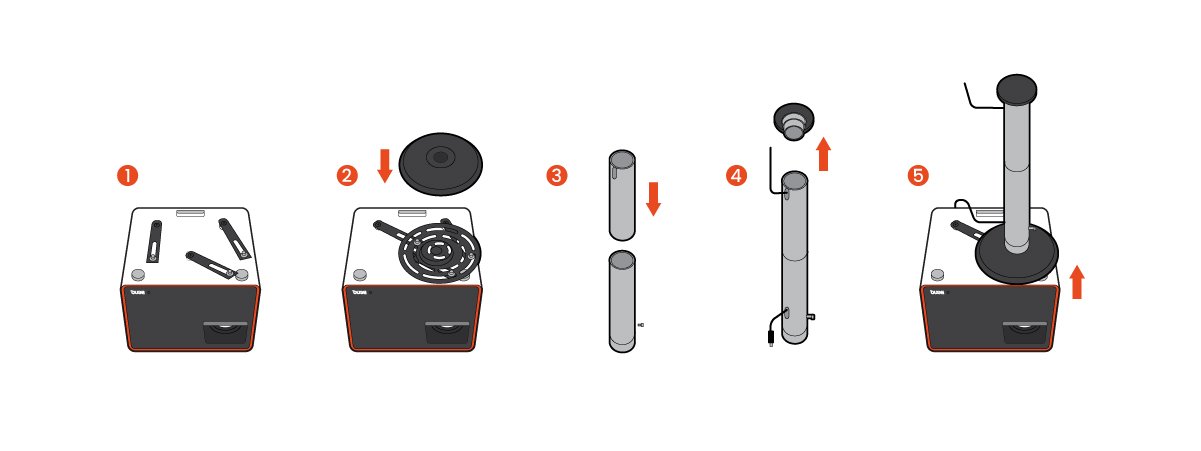
Here are the main steps needed to mount your brand new X3000i gaming projector to your ceiling with the BenQ universal ceiling mount.
Adjust tilt or rotation angle if needed, and you’re all done!
Remember, when turning on your projector for the first time, make sure to select “Front Ceiling” in the Setup Wizard to begin enjoying big screen content.
Tips: Or change projector position by pressing the MENU key to open OSD (On-Screen-Display) menu, then go to Advanced menu > Installation > Projector Position, and select "Front Ceiling“.
How to Mount Projector to Ceiling by BenQ Ceiling Mount?
BenQ CM00G3 Ceiling Mount Installation using the BenQ X3000i 4K Gaming Projector
Since the BenQ universal ceiling mount kit was designed for utmost flexibility and versatility, there’s a lot we can share about it. Here are some important tips and tricks to keep in mind.
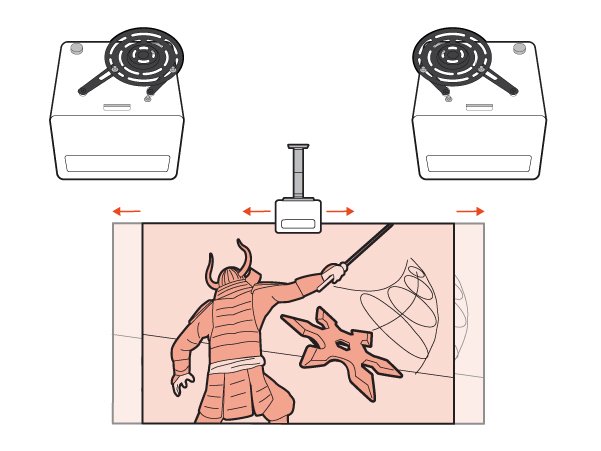
1. Adjustable horizontal shift using the freely-moving hinge module plate and brackets: used to move the projector horizontally to compensate for image offset.
Tips: Do note that the required shift should be decided before mounting, as changing it afterwards requires disassembly and reinstallation. Do not place your mount too far away from the center of projector weight, as that could lead to unwanted projector wobble or other movement. For beginners, we suggest starting with the center of the lens as your guide.
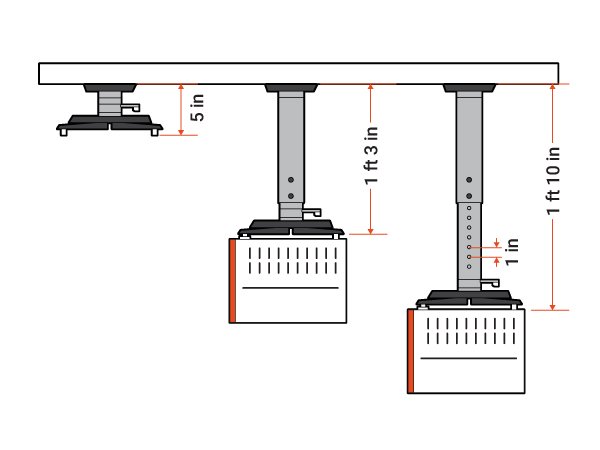
2. The mounting cylinders are adjustable as you may have noticed, with securable notches for different mount lengths. The range is 5 inches to 1 ft 10 inches. This gives you plenty of flexibility for different rooms and situations, but make sure you calculate cylinder extension based on ceiling height before installation. Changing your mind later will be a big hassle.
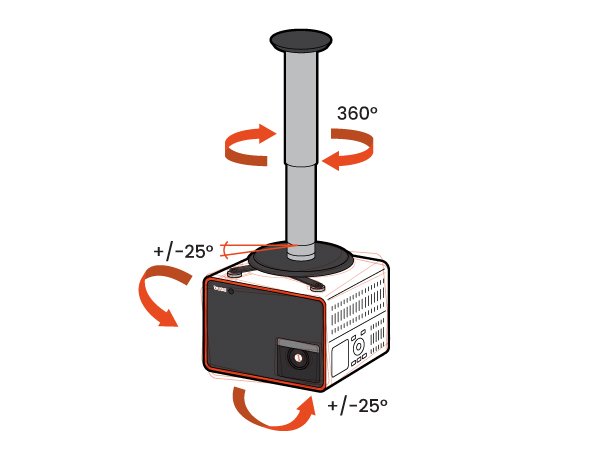
3. Adjustable tilt angle using the ball joint for 2-way vertical and horizontal adjustment by up to 25 degrees in each way: used to compensate for screen keystone in a secure mechanical way when your ceiling is uneven. Better than digital keystone, especially on a gaming projector, as digital keystone causes input lag. Unlike other aspects, this can be adjusted freely after installation.
4. Adjustable 360-degree horizontal rotation using the ball joint: used to rotate projection direction to your screen and helps with cable management.
Note: while adjustment can be done any time, make sure to secure the knobs for stability and safety.
We’ve compiled a list of recommended screens from our trusted partners at Elite Screens that pair excellently with the X3000i in different ambient light conditions.
Aeon Series, thin bezel fixed frame | Matte white material for dark room environments
Sable Frame 2, standard aluminum velvet fixed frame| Matte white material for dark room environments
Aeon Series, thin bezel fixed frame| CineGrey 3D material for rooms with ambient light
Sable Frame, standard aluminum velvet fixed frame| CineGrey 3D material for rooms with ambient light
ezCinema 2, floor pull up portable screen | Matte white material for dark room environments
For more info and insight, we think you should take time to check out these resources.
Learn more about screen types and tips for choosing the right screen: How to Choose Projector Screen Type, Size, Material, and More
Tune in to projector pros on YouTube:
X3000i with our CineGrey 3D ambient light rejecting electric screen
Reviewed by Joelster
X3000i with our StarBright 9 ambient light rejecting fixed frame screen
Reviewed by EBP Man
And find more info about our partners at Elite Screens.

{{item.productWordingTag}}
{{currency}}{{item.finalPrice| numberThousandsCommas | numberDecimalPoint}} Save {{currency}}{{item.saveAmount | numberThousandsCommas | numberDecimalPoint}} Save {{item.savePercent | numberThousandsCommas | numberDecimalPoint}}%
new device price{{currency}}{{item.regularPrice| numberThousandsCommas | numberDecimalPoint}}